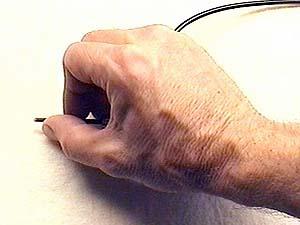
General Engraving Procedure: Place
the graver handle in the lower part of the palm. Hold the graver shank between your
index finger and thumb. The index finger should ride about midpoint on the shank, and your
thumb tip should be even with the point of the graver or a little behind it. When
applying the graver to the work, use your thumb as a rest and a brace by placing it on the
work first, and then slowly set the point down. Using the thumb in this manner will
help steady your hand so that you may bring the point of the graver right where you want
it. Set the point onto the start of the cut. The angle of the heel of your
graver will determine at what angle the graver should be setting on the work. Keep
your thumb on the surface of the work, along with the point, but slowly switch the
pressure/weight from your thumb over to the point so that your thumb is now free to slide
along the surface of the work. Slowly depress the foot control and when the Air
Graver begins impacting, let the point move ahead. Right at the start of a cut you
will need to alter the angle of the graver in relation to the work, adjusting it up or
down to find the angle the cutting point dives into the work and the angle it begins to
come out of the cut. T he idea is to stay balanced between these two points. It is a bit
like riding a bicycle by finding the balance point - balance in this case means staying in
the cut at a certain depth.
While cutting, let your
thumb drag softly along the surface of the work. Your thumb can act like a brake in
case you lose "balance" and the graver comes out of the cut. Since the
thumb is right on the surface it can help catch your hand and prevent the graver point
from slipping across your work. While engraving, use only enough pressure on the graver to
hold the point in the cut. With the Air Chasing Graver, let the power of the piston
impacts do the work. Try to learn to use the "balance" angle of the graver
in the cut and the foot pedal to control the depth of the cut. Exerting extra
pressure with your hand by pushing forward or down can cast a burr on the edges of the
cuts, and you can also get hurt if you push hard and the graver comes out of the cut
unexpectedly. After more experience is obtained you will get a feel for when it is
not necessary to have your thumb dragging along the surface as a brake. This
technique can be used any time there is a risk of the graver slipping out of the cut (i.e.
on a curved surface or when engraving across a joint between hard and soft materials).
Setting up the Air Chasing Graver for
different types of engraving or impacting requirements:
The Air Chasing Graver is fully
customizable to a variety of tapping and impact settings. The adjustment range
may be set from very delicate tapping to very hard impacts.
The means to vary adjustments for impact control are:
1. Length of stroke mechanism. This adjustment also adjusts the rate of impacts per
minute. (A longer stroke will hit harder than a short stroke.)
2. Size and weight of piston used. One light and one heavy piston are supplied with
the tool. (A heavy piston will hit harder than a light one.)
3. Air regulator adjustment setting from 2.5PSI to 50PSI. (More air pressure will
increase the velocity of the piston and also increase the impacts per minute.)
4. Needle valve adjustment for setting oscillation idle (from a coarse to fine idle).
To set the tool for the hardest impacting: Adjust the length of stroke to
the longest setting by turning the adjusting mechanism counterclockwise until it stops.
Tighten the locking setscrew to hold this setting in place. Adjust the
air regulator to an air pressure no higher than you plan on needing, as this will give
full range of movement control on the footpedal. Recommended settings for
hard-hitting impacts are 15 to 40PSI. For even harder hitting you may remove the
muffler felt from the exhaust outlet (see manual) which will leave the exhaust
unrestricted, resulting in stronger impacts. For the hardest impacting use the
larger/heavier piston although it may be found the smaller piston works well for the type
of work for which you are setting up the tool.
To set the tool for medium impacting: Adjust the length of stroke to a
medium length by turning the adjusting mechanism counterclockwise until it stops and then
turn it clockwise 1 turn. Tighten the locking setscrew to hold this setting in
place. Set the air regulator to an air pressure no higher than you plan on needing,
as this will give full range of movement control on the footpedal. Recommended
settings for medium impacting are 10 to 30 PSI. The large or small piston may be used.
The larger piston does not have to work as hard to do the same work. It will
use less air and require slower impacts to accomplish the same cut. It may be
desirable to have a higher impact rate by using the small piston. In other words, using a
smaller piston will require more air pressure, resulting in a higher impact rate than the
larger piston to do the same work.
To set the tool for very fine
impacting: For this fine setting, first adjust the air regulator to an air
pressure no higher than you plan on needing, as this will give full range of movement
control on the foot pedal. Recommended air regulator settings for super fine
impacting are 2.5 PSI to 5 PSI. Place the small piston in the handpiece.
Setting the length of stroke mechanism and needle valve (idle oscillation) are critical
for this fine impacting setting and require patience until the procedure is learned. With
the air graver idling turn the needle valve very slowly clockwise to give the tool less
and less idling air. You want the tool to oscillate as finely as possible without
the oscillation stopping during use of the tool. When you begin to get the
oscillation idling fine it can be helpful to hold the tool close to your ear so you can
here the faint oscillation idle while continuing to adjust it....but not so faint that it
stops. Once the needle valve is set and while the tool is oscillating, adjust the
length/speed of stroke mechanism. Turn the length of stroke screw clockwise slowly
while the tool is oscillating (idling). Turn it until the tool just begins
impacting. Now back it off (counterclockwise) just a little. What you are trying to
achieve is the shortest stroke possible without the tool impacting while it is
idling. Therefore, it is critical to have the idle very fine (but not so fine that
it stops easily). Once you have taken the time to set the idle this fine
you should not have to readjust it. If you do need to make a fine adjustment to the
idle you may find it easier to readjust the air regulator slightly, which will also adjust
the idle. A finer idle will be achieved if you make sure the bore and piston are
very clean (see the owner's manual for cleaning procedure). Once you have the
tool set up you will find you have incredible control for very fine 20x to 30x microscope
engraving. Using this fine impact setting for fine cuts gives greater control than
trying to palm push. The impacts will be fine and fast, which also means less chance
of graver point breakage.
With these fine settings the
impacts will be so delicate that to try and engrave without magnification is
impractical. Therefore, depending on the work at hand, rather than trying to set for
the finest possible impacts it may be better to lengthen the stroke just a small amount as
the idle will be easier to set and the tool will have slightly more power.
It should be noted that setting the idle for use in heavy or medium impacting is not as
critical as setting it for very fine impacting, and therefore it can be set coarser.
The heavy, medium and fine impacting settings described above are just three
of the possible configurations of the Air Chasing Graver. The tool has a wide
range of setting possibilities. For instance, you may set the tool for a short
stroke using the large piston and setting the regulator for 40 to 50 PSI. Try this
setting for medium depth engraving. Set this way the tool can increase to 24,500
impacts per minute, or it may be desired to lengthen the stroke to slow the impacts and
give more top end power. Another possibility is to use the small piston with these
same settings.
If you are learning to engrave, use the large piston and set the length
of stroke mechanism at mid range
(1 turn in clockwise from full open). First try setting the air regulator at 20PSI
but if after initial use you
find you want more power, increase it to 30psi or adjust the length of stroke slightly
longer,
which will also give more power. This setting will work well to learn the basics.
Learning to Engrave
If you are learning to engrave
and would like to use one of Steve Lindsay's designs for a practice plate, please email
Steve and he will be happy to grant permission. In fact, if you purchased a Lindsay
Air Chasing Graver you may submit a photo of the engraved plate or send the plate itself
to Steve and he can help by critiquing the engraving with suggestions and pointers. While learning the basics and mechanics of
engraving it is nice not to have to take the time of designing a layout too, but just to
concentrate on learning to control the tool. Designing layouts can be worked
on later. Doodling on a practice plate with your graver can be the most
expedient way of learning the mechanics of hand engraving. Once you learn the basics of
running your graver the next step is to begin tracing and following lines on a practice
plate. Try your hand at sketching designs right on the metal for tracing or you may
request the use of some of the Lindsay designs. You will be granted permission to copy or
trace one but only on a practice plate for yourself and not to be sold. Once you become
proficient at following lines with the graver it is time to begin becoming creative with
your own layouts and designs. Through time and practice you will begin to develop
your own style. Collectors will begin to recognize your work without even seeing
your signature and you will become more in demand. Try to only let out work that is your
absolute best and you will become known as only doing the finest engraving.
Permission to copy Lindsay engravings will be
granted only on practice plates for learning purposes.
Inexpensive practice plates
For an inexpensive practice plate
quarters, nickels or pennies work great. File the image off one side and polish it
up and you'll have a nice little practice plate. Engrave them and even sell them on
ebay. There are quite a few engravers re-cutting the Indian side of a buffalo head
nickel, making the Indian look like a hobo or anything else you can imagine and selling
them on ebay. Here is an ebay search.
Disclaimer-Warning:
Destroying Federal currency coins in this fashion may be deemed as a Federal offense and
may be subject to incarceration leading to a prison term. Therefore it would be in your
best interest to research your country's legalities prior to defacing any coin.
Engraving Under a Microscope
For a beginner, a
microscope may make it tougher for initial learning - it may be better to start engraving
without magnification, at least for a while. Although, an Optivisor may be helpful.
A good time to try engraving under a scope may be after mastering the basics of cutting a
line and curve with a square graver. For a beginner learning the basics, a scope may
complicate matters and can be overwhelming.
Engraving Microscopes
If you plan to spend a lot of time under a
scope you will want to purchase the best you can afford. Lesser quality scopes will
make you feel beat at the end of the day from eye strain and headaches. I engraved under a
Baush&Lomb scope for 18 years. I thought the optics were great and I got along fine,
but I never had the opportunity to look through a better scope. For a short time I
experimented with an America Optical, a Nikon, and an Olympus, but I still preferred the
Baush&Lomb I had been using for so long and which I had become used to. A couple
of years ago I had the opportunity to look through a Zeiss OPMI 1. This scope is
incredible. The optics are much clearer than any other scope I have tried. Another
quality scope brand is "Wild", although Zeiss is the preferred scope of
surgeons. Both Zeiss and Wild scopes show up on 'ebay' from time to time. New, I believe
they cost about. $10,000 without a stand (boom or otherwise) and $15,000 with a floor
stand. For the full motorized wheel-around operating OPMI scope, you'll pay
$150,000. On 'ebay' I have seen used OPMI scopes without a stand sell for $2200 to $2500.
If you are getting up in years,as I believe I'm beginning to, you will find these scopes
will be easier viewing.
You will notice that the better quality scopes with clearer optics will "click"
through magnification
powers. For example: 6x, 10x, 16x, 25x, 40x. Less expensive scopes try and use
one lens for all powers, on a dial that you zoom anywhere between 6x through 40x.
The idea of being able to zoom anywhere does sound like a better feature, but the scopes
are not as clear as stepped ones. This is why scopes like Zeiss and Wild have
different lenses for each power that you "step" through. It is a bit of a trade
off - you get clearer viewing, but only at the stepped powers. I have not found the
fixed gradations to be a problem and was very willing to give up zooming for super clear
viewing even in step powers.
The Carl Zeiss home page is at: www.zeiss.com I believe the current OPMI scope
is called a OPMI® 1-FC. Another one is called OPMI® Neuro (Neurosurgery). Zeiss sells
direct... No dealers.. except for used scopes. While you're at the Zeiss site take a
look at the surgical loupes, under surgical products.. Below are links to microscope
dealers that carry different brands... new and used.
http://www.arcmicrooptics.com/
http://www.surgicalmicroscopes.com/
http://www.labtek.net/
More
microscope dealers and manufactures
Engraving Vise
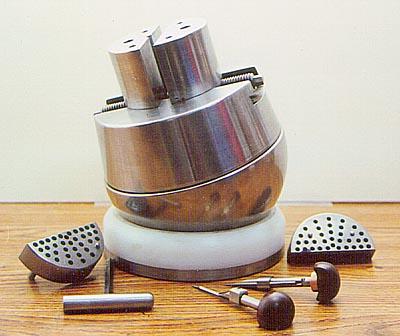
Ray Letourneau,
an engraver and machinist makes a nice ball vise. It has a great deal of mass @
45lbs. The more mass and solid you can hold your work the nicer and cleaner your
cutting will be. Ray makes these himself along with a unique adjusable palm push
graver handle/holder that is the invention of master engraver Robert Swartley. The
vise is available through Ray, $400 each plus shipping, as are the graver handles.
Call Ray direct at (503) 397-6228.
EngravingSchool.com has more tips as wells as videos.
Back to the Air Chasing Graver page